2. Linux Starter Guide

This document explains how to set up a Linux environment, build the sdk_app_helloworld application, flash it to the BL602 and verify the output through a serial port reader.

2.1. Installing prerequisites and cloning repository

The project requires a C/C++ compiler, Python 3 interpreter, Python package manager (pip), make, git and a serial port reader (screen is used).

One liner for Debian:

sudo apt install build-essential python3 python3-pip git screen

One liner for Arch:

sudo pacman -S base-devel python python-pip git screen

Next, clone the SDK repository:

git clone --recursive https://github.com/pine64/bl_iot_sdk

2.2. Compiling

First, set BL60X_SDK_PATH to the location of the pine64/bl_iot_sdk repository. Next, set CONFIG_CHIP_NAME to the make of the chip in this case BL602. If the repository is already cloned, pwd can be used to correctly set the environment variable:

cd bl_iot_sdk
export BL60X_SDK_PATH=$(pwd)
export CONFIG_CHIP_NAME=BL602

In order to build all example projects write make in the project directory. In order to build only a single example go to the directory of the example and write make. In order to build sdk_app_helloworld:

cd customer_app/sdk_app_helloworld
make

Build artifacts will be located in the build_out folder in each example. Change into the output of the example you want to flash and ensure that the .bin file exists:

cd build_out
ls -la *.bin

2.3. Connecting the Hardware

See the relevant section in Connecting the Hardware. Ensure that the board is set to be in loading mode.

2.4. Flashing

Download the latest blflash version and chmod it to be executable:

chmod +x blflash*

Alternatively it is available from the Arch User Repository: blflash for the latest release and blflash-git for the latest commit.

Invoke the blflash binary with the flash <project_name>.bin --port <port> arguments. If the board is connected via USB and no other devices are connected the port is likely going to be /dev/ttyUSB0. If in doubt, get a list of USB ports with ls -la /dev/ | grep USB.

If you do not have any such device, ensure your kernel has the ch341 driver enabled.

./blflash-linux-amd64 flash sdk_app_helloworld.bin --port /dev/ttyUSB0

If flashing is not successful ensure that:

  1. The device is connected to the computer correctly (red LED (LED2) should be lit).

  2. The IO8 jumper is correctly set to cover the H position. Press RESET to make sure the jumper change is in effect.

  3. The sdk_app_helloworld.bin file exists and is correctly built at the correct location.

  4. The correct port is used.

  5. If attempting to flash something that is not the sdk_app_helloworld example, try flashing that first to ensure that the toolchain is working.

2.4.1. Alternative Flashing Tools and Information

mkroman keeps a feature matrix of alternative flashing tools.

lupyuen has an overview of alternative tools as well as an overview of the different components of the ROM.

2.4.2. BouffaloLabDevCube

Boufallo Lab has their own proprietary flashing program. It can be found by at their official site. If a login page is reached, click the button labeled “Dev Zone”. Extract the .zip file and execute BLDevCube. Select BL602/604 as the Chip Type and click Finish. Notice that the application might be very slow after clicking Finish.

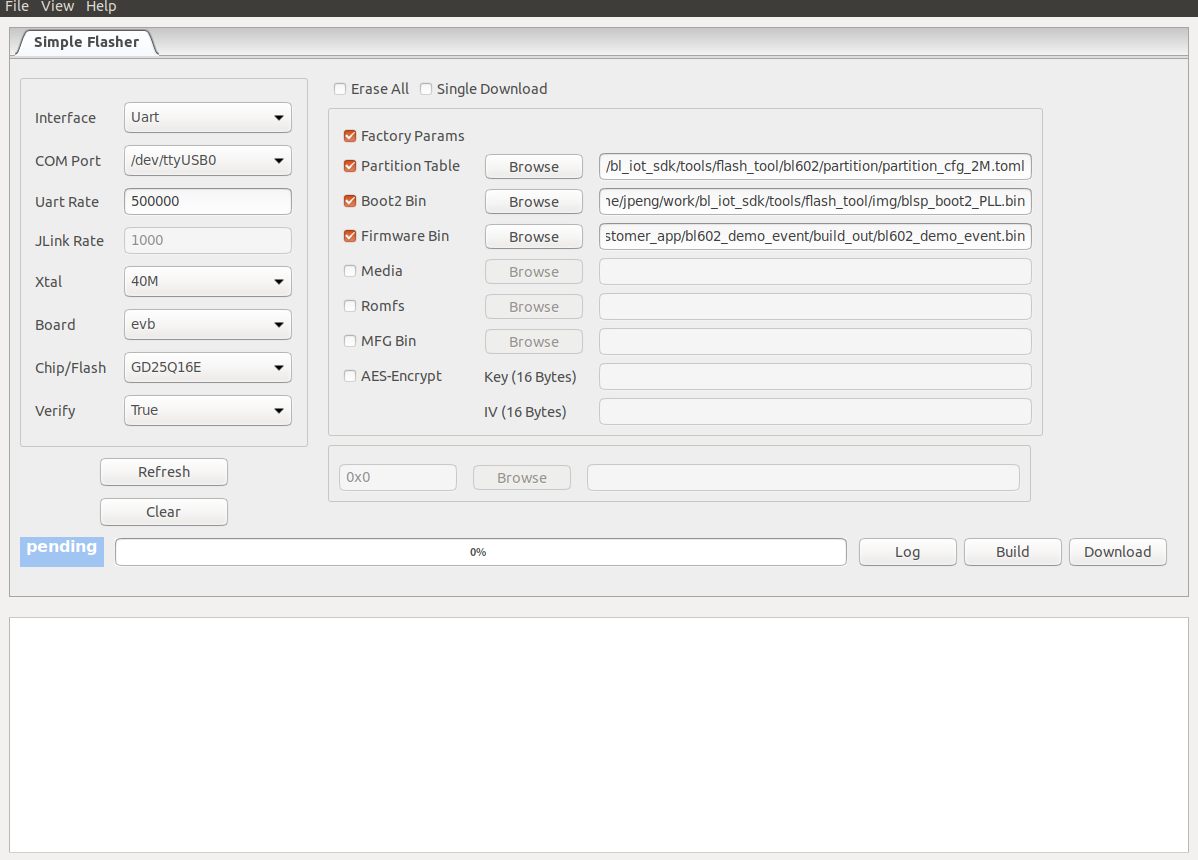
Set the application up as shown in the image below: Important settings are:

  • Interface: Uart

  • COM Port: /dev/ttyUSB0

  • Uart rate: 2000000

  • Factory Params: Checked

  • Partition Table: ./bl602/partition/partition_cfg_2M.toml

  • Boot2 Bin: ./bl602/builtin_imgs/blsp_boot2.bin

  • Firmware Bin: sdk_app_helloworld.bin

    Settings for flashing the image bl602_demo_event.bin.

Click Download (may be called Create & Download in newer versions) to flash the image. You should see the following if flashing is successful:

Program after successfully flashing an image.

More information can be found at Dev Cube introduction.

2.5. Testing the output

Change the jumper on IO8 to cover L and press the reset button.

Open screen with a baud rate of 2000000 (two million) and the same port used in Flashing.

screen /dev/ttyUSB0 2000000

The terminal should be blank. If you’re being spammed with unknown symbols change jumper pin IO8 to L and press RESET. After pressing RESET the following should be in the terminal:

[helloworld]   start
[helloworld]   helloworld
[helloworld]   end

The above should appear on the terminal every time RESET is pressed.

To exit screen press Control-a k y.

If you have issues with terminal output, try another serial port emulator:

  1. gtkterm : gtkterm --port /dev/ttyUSB0 --speed 2000000

  2. minicom : minicom -D /dev/ttyUSB0 -b 2000000

Further information on the sdk_app_helloworld example can be found at Hello World.